Personalising Search using Sitecore CDP and Personalise (Boxever) -- Part 2
In Part 1 of this series, I covered the background of relevance scoring in search and covered setup of Search Studio and Sitecore CDP & Personalise. In part two I will work through some example code that pulls these products together to show end to end search capability using the setup we covered in the last post.
This demo code provides a command line "head" which utilises the Sitecore and Search Studio APIs to return personalised search results for the provided search terms of user.
Overview
The high level flow of the demo application is reasonably simple:
       Console.WriteLine("Getting search model for user " + email);
       var searchModel = await GetModelForUserAsync(email);
       Console.WriteLine("Search Model calculated: " + searchModel);
       Console.WriteLine("Getting search results");
       var searchResults = await GetSearchResultsAsync(searchModel, term);
       if (!(searchResults is null))
         RenderResult(searchResults);
- We use an email passed as a command line parameter to call Sitecore Personalise to get the search model (if any) that we want to use to personalise the serach results.
- We call search studio passing the returned search model and the search term passed as a command line parameter(/li>
- We render the search results to the screen
Retrieving the Search Model
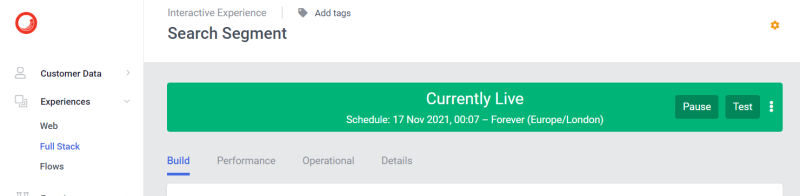
As outlined in part 1, we have set up a decision model in Sitecore Personalise that uses data from the CDP record to determine which search model should be returned. This model has been exposed thorugh a Full Stack experience API that we have called "search_segment". The code for the method that makes the call is as follows:
     private static async Task<string> GetModelForUserAsync(string email)
     {
       const string CLIENT_KEY = "xxxx"; // client key a string like "psfu6uh...................4cqrx"
       const string BASE_URL = "https://api.boxever.com/v2/callFlows";

       var client = new HttpClient();
       client.DefaultRequestHeaders.Accept.Add(
           new System.Net.Http.Headers.MediaTypeWithQualityHeaderValue("application/json"));
All calls to full stack experiences set up through Sitecore Personalise will use the same API endpoint, https://api.boxever.com/v2/callFlows (technically, there are two possible domains based on where your Sitecore CDP instance is set up - with an alternative endpoint where APAC region is used (api-ap-southeast-2-production.boxever.com). The request needs to be sent with the application/json media type.
       var REQUEST_BODY = @"{
           ""clientKey"": """ + CLIENT_KEY + @""",
           ""channel"": ""WEB"",
           ""language"": ""EN"",
           ""currencyCode"": ""AUD"",
           ""email"": """ + email + @""",
           ""friendlyId"": ""search_segment""
         }";

       var requestBody = new StringContent(REQUEST_BODY, Encoding.UTF8, "application/json");

       var result = await client.PostAsync(BASE_URL, requestBody);
       result.EnsureSuccessStatusCode();

       var raw = await result.Content.ReadAsStringAsync();
The callFlows API expects a JSON object to be POSTed that will determine the experience that is to be executed, and identify the CDP record to use as an input. The documentation of the expected input parameters can be found here. The values for channel, language and currency are required - but their values aren't particularly important for us here. The key parameters for us are:
- clientKey: this is a specific key for your instance that is used to authenticate the call. I found the best place to get this was to check the TEST payload in the Sitecore CDP interface (see the Test button top left here)
- email: This is the email address of the user that we want to target, used to look up the Sitecore CDP record to utilise in the decision model
- friendlyId: This is the name of the experience we want to process the request, which will also define the response payload. This can be found on the Detail tab of the experience in Sitecore CDP

The results returned by the API call will be in the format we defined for the full stack experience in Sitecore CDP in Part 1

       var parsedResult =  JsonSerializer.Deserialize<DecisionResult>(raw);

       return parsedResult.SearchModel;
     }
The returned JSON is parsed by the JsonSerializer into an object model and we extract the Search Model value which will be used to pass into the Search Studio endpoint
Executing the search
The search model from retrieved from the Sitecore Personalise call will now be passed along with the search term (if provided) into the Search Studio
	   var username = "app40-api";
       var password = "xxx";
       var client = new HttpClient();
       var byteArray = Encoding.ASCII.GetBytes($"{username}:{password}");
       client.DefaultRequestHeaders.Authorization = new System.Net.Http.Headers.AuthenticationHeaderValue("Basic", Convert.ToBase64String(byteArray));
       client.DefaultRequestHeaders.Accept.Add(
           new System.Net.Http.Headers.MediaTypeWithQualityHeaderValue("application/json"));
The username, password and base request URL are all managed in the SearchStax Settings screen (see below). As above the username and password are used to apply Basic Authentication to the API request.

The search term and search model are then passed as querystring parameters to the request which is submitted as an HTTP GET. The query string parameters passed are:
- q - this is the search query to execute. Passing * will return all results, which is a good way to really see the impact of the search model
- model - this is the name of the searh model returned from the Sitecore CDP call. This must match the model name created in Search Stax
       var requestUrl = "https://xyz.searchstax.com/solr/ss849763-SearchStudioCorpSite/emselect?q=" + (string.IsNullOrWhiteSpace(term) ? "*" : term);
if (!string.IsNullOrWhiteSpace(searchModel))
         requestUrl = $"{requestUrl}&model={searchModel}";
       var streamTask = client.GetStreamAsync(requestUrl);


	var results = await JsonSerializer.DeserializeAsync<SearchResult>(await streamTask);
       if (results != null && results.response != null && results.response.docs != null)
         return results.response.docs;
       else return null;
The resulting JSON returned from the Search Stax API is very rich containing information on results, facets, highlighting and other things. Building a class model to properly deserialise this would be a bit complex. Fortunately Visual Studio has a very useful tool to help you out here, which will generate a class structure from an example JSON output of the class. Simply copy the JSON to the clipboard, then select Edit > Paste Special > Paste JSON as Classes to create the code (see below). Alternatively you can just crib the code from the demo in GitHub

Once the results are parsed, we grab the collection of docs (the search results from the search index)
Rendering the results
Rendering the results is then as simple as iterating through each of the Doc objects and writing the results to the screen. Note that anything that you want to be able to display in the search results needs to be captured in stored fields in the search index so that it can be returned in the results. e.g. if you wanted to add an author name, publication date or similar
     private static void RenderResult(IEnumerable<Doc> results, int maxToDisplay=10)
     {
       int i = 1;
       foreach(var d in results)
       {
         Console.ForegroundColor = ConsoleColor.Yellow;
         Console.WriteLine($"Result {i}");
         Console.ForegroundColor = ConsoleColor.Cyan;
         Console.WriteLine($"Title: {d.title[0]}");
         Console.ResetColor();
         Console.WriteLine($"Type: {d.content_type[0]}");
         Console.WriteLine($"Paths: {d.paths[0]}");
         Console.WriteLine();
         i++;
         if (i > maxToDisplay) break;
       }
     }
Running the application, and passing the email address of a user known in the Sitecore CDP, outputs personalised search results.

I hope you find this demo useful, the full code is available at my GitHub.


Comments
Post a Comment